 Save to Pinterest
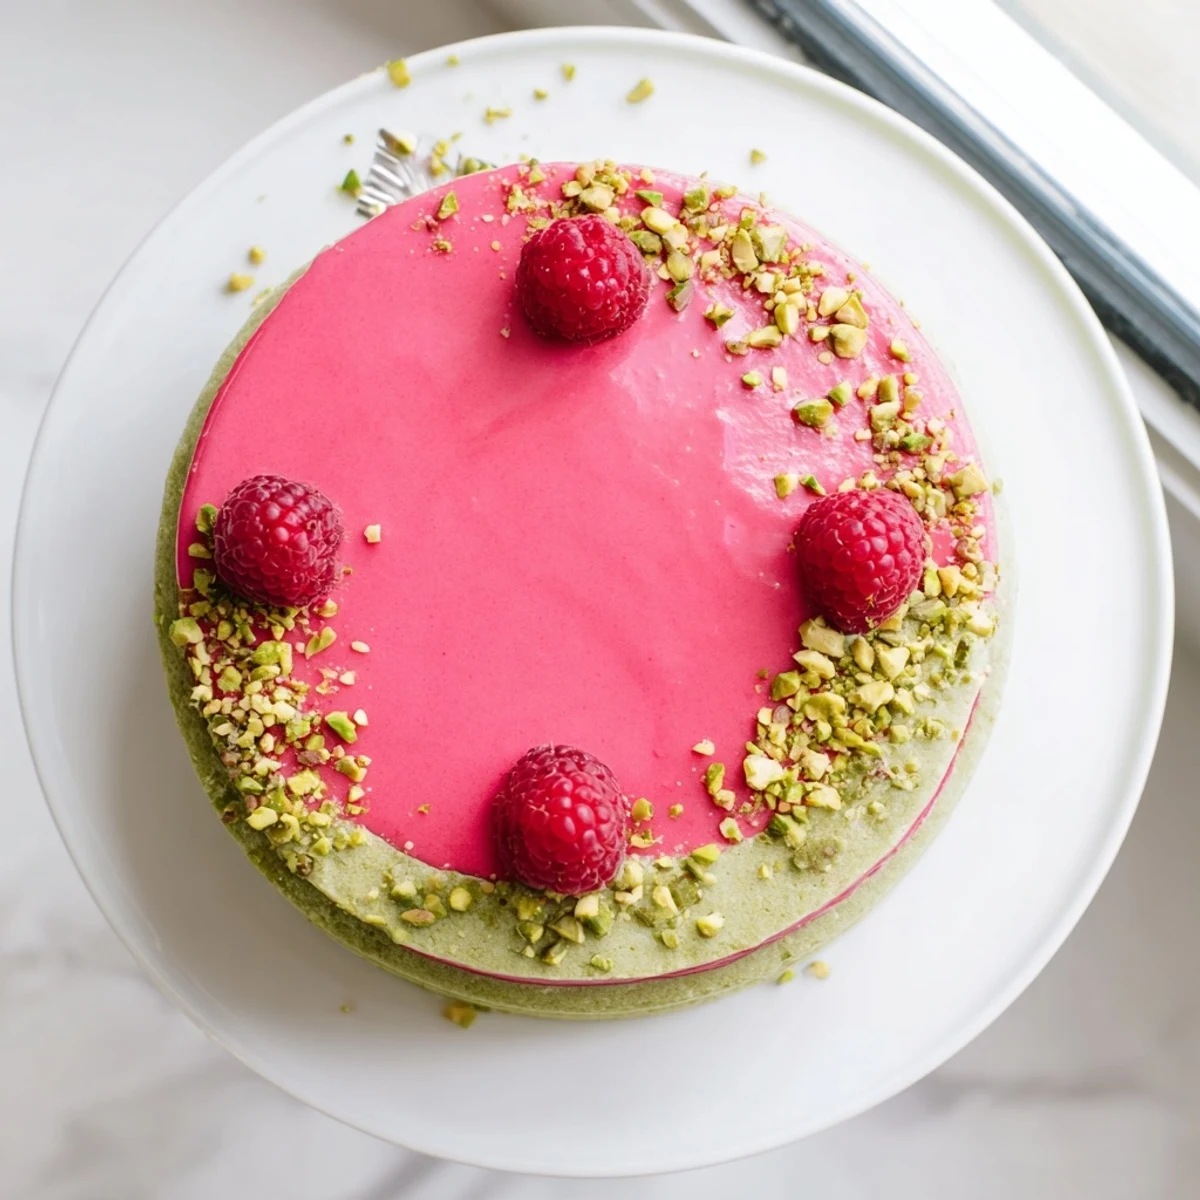
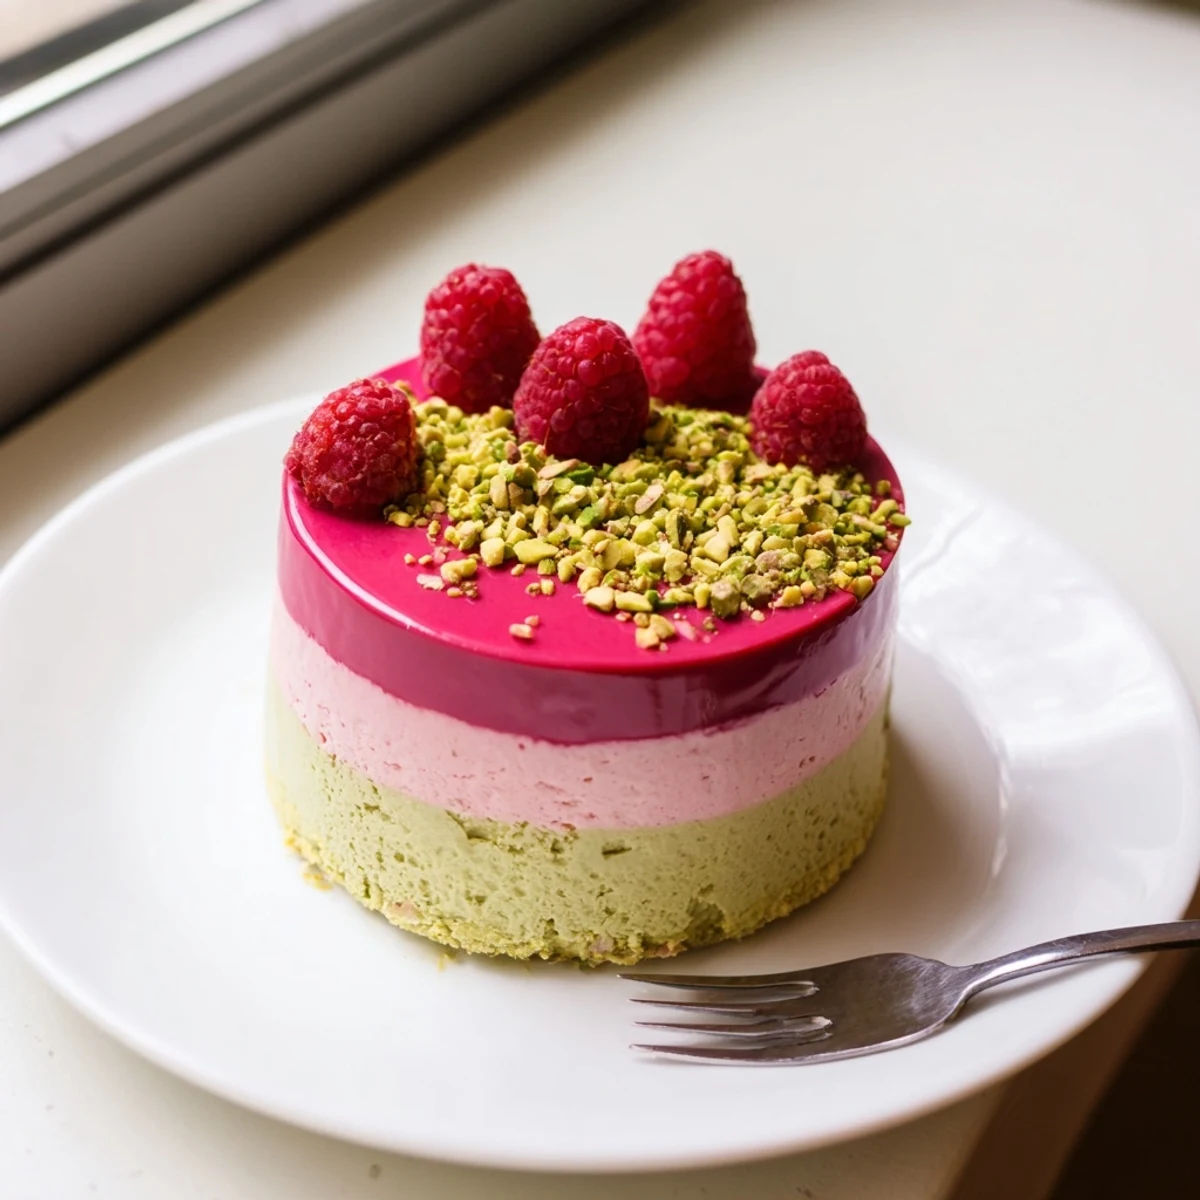
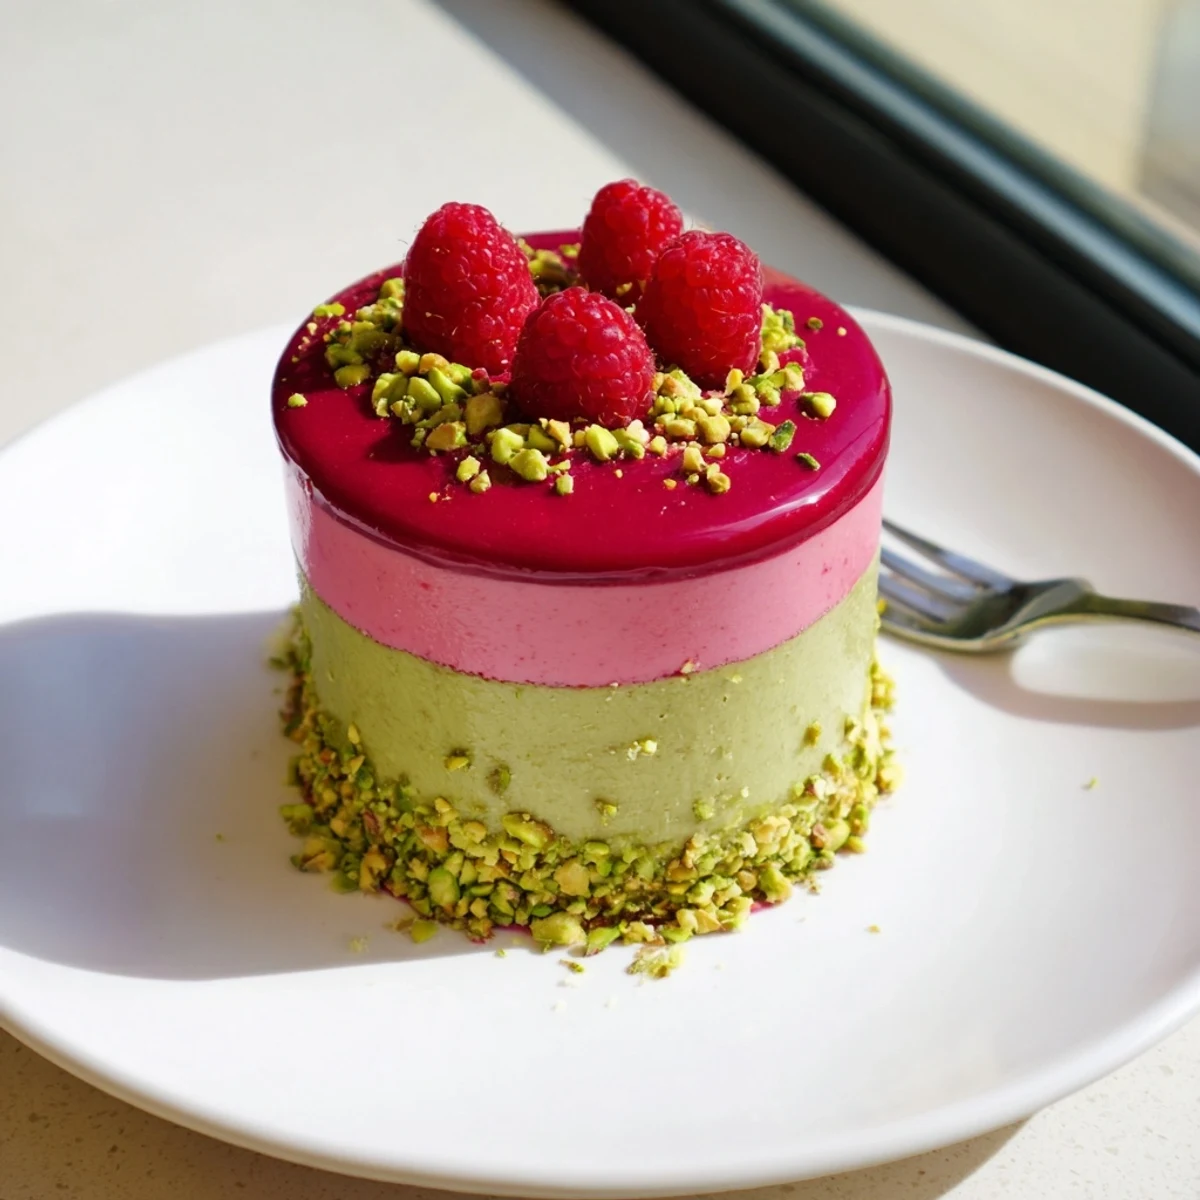
 These elegant individual desserts combine delicate pistachio sponge with alternating layers of creamy pistachio mousse and vibrant raspberry mousse, all topped with a glossy raspberry glaze. The French-inspired creation requires assembly in ring molds and proper chilling time for each layer to set. The result is a stunning multi-layered conergy perfect for special occasions.
Preparation involves creating the light pistachio sponge base, preparing two distinct mousses—one nutty and rich, the other bright and fruity—and finishing with a mirror-like raspberry glaze. The contrast between the earthy pistachio and tart raspberry creates sophisticated flavor balance.
The first time I attempted these delicate layered cakes, my tiny apartment kitchen looked like a pistachio explosion. My roommate wandered in, rubbing sleep from her eyes, and asked if I'd started a baking business overnight. We ended up eating the slightly imperfect sponge circles warm with butter, watching romantic comedies while the mousses set in the refrigerator.
Last summer, I made a batch for my sister's engagement dinner. My father, who claims to not like fancy desserts, ate three and kept asking what made the green layer taste so incredibly rich. The next morning, I found him in the kitchen attempting to make pistachio paste from raw nuts, blender humming determinedly at 6 AM.
Ingredients
- 60 g pistachios, finely ground: The vibrant green color and distinct nutty flavor are worth seeking out high quality nuts. Toast them briefly before grinding for deeper flavor.
- 40 g all-purpose flour: Provides just enough structure to hold those delicate air bubbles in the sponge without making it tough or dry.
- 2 large eggs: Room temperature eggs whip up beautifully and create that light, airy texture we want in the sponge layer.
- 60 g granulated sugar: Sweetens the sponge while helping create structure during the creaming process.
- 30 g unsalted butter, melted: Butter adds richness and helps create a tender crumb. Melt it completely so it incorporates evenly.
- 1/2 tsp baking powder: Just enough lift to give the sponge a delicate rise without making it cakey or dry.
- Pinch of salt: Enhances the pistachio flavor and balances sweetness. Do not skip this tiny but mighty ingredient.
- 150 ml whole milk: Creates a creamy custard base for the mousse. Whole milk provides the best richness and texture.
- 100 g pistachio paste: The star of the show. Look for pure pistachio paste without added oils or artificial colors for the most authentic flavor.
- 3 egg yolks: These create the silky, luxurious custard that forms the base of the pistachio mousse.
- 45 g granulated sugar: Sweetens and stabilizes the custard. The sugar also helps create that glossy finish we love.
- 3 sheets gelatin: Essential for setting the mousse layers properly. Bloom them in cold water first for smooth results.
- 200 ml heavy cream, whipped: Creates that cloud-like texture in both mousses. Cold cream whips up best, so chill your bowl too.
- 200 g fresh or frozen raspberries: Frozen berries work perfectly here and are often more available. The tartness balances the rich pistachio beautifully.
- 60 g granulated sugar: Adjust based on your berries sweetness. Taste the puree before adding gelatin to get it just right.
- 2 tbsp lemon juice: Brightens the raspberry flavor and helps balance the sweetness. Fresh lemon juice makes a noticeable difference.
- 3 sheets gelatin: Sets the raspberry mousse while keeping it silky and smooth. Proper blooming is key here.
- 200 ml heavy cream, whipped: Lightens the raspberry puree into a mousse. Whip to soft peaks for the most velvety texture.
- 100 g raspberry puree: Strain it thoroughly for that mirror-like glaze. Any seeds will create imperfections in the finish.
- 50 g granulated sugar: Sweetens the glaze while helping create that gorgeous glossy shine we are after.
- 2 sheets gelatin: Sets the glaze just enough to hold its shape while staying beautifully shiny and smooth.
- 30 g chopped pistachios: Toast them lightly to bring out their nutty flavor and add a lovely crunch contrast.
- Fresh raspberries: The perfect finishing touch. Choose plump, bright berries for the most beautiful presentation.
Instructions
- Bake the pistachio sponge:
- Preheat your oven to 175°C and line a baking tray with parchment paper. Whisk eggs and sugar until pale and fluffy, then gently fold in ground pistachios, flour, baking powder, and salt. Stir in melted butter until just combined, spread evenly on your tray, and bake for 12-15 minutes until lightly golden. Let cool completely before cutting circles with a 6 cm ring mold.
- Make the pistachio mousse base:
- Heat milk and pistachio paste in a saucepan until just simmering, watching carefully so it does not scorch. Whisk egg yolks and sugar until pale, then gradually pour the hot pistachio milk over yolks while whisking constantly. Return the mixture to the saucepan and cook gently until thickened slightly, stirring constantly. Remove from heat and stir in soaked gelatin until completely dissolved.
- Complete the pistachio mousse:
- Cool the custard to room temperature, which will take about 20-30 minutes. Whip heavy cream to soft peaks that hold their shape gently. Fold the whipped cream into the cooled pistachio custard in three additions, being careful not to deflate the air you have worked to create.
- Prepare the raspberry mousse:
- Blend raspberries with sugar and lemon juice until completely smooth, then strain through a fine mesh sieve to remove all seeds. Warm about one third of the puree and dissolve soaked gelatin in it, then mix with the remaining puree. Cool to room temperature, then fold in whipped cream until no streaks remain.
- Assemble the layers:
- Place a sponge circle in the base of each mini cake ring or silicone mold. Pipe or spoon pistachio mousse over the sponge, smooth the surface, and refrigerate for 30 minutes until set slightly. Add a layer of raspberry mousse on top, smooth the tops carefully, and freeze for at least 3 hours until completely firm.
- Create the glossy glaze:
- Warm raspberry puree and sugar in a saucepan until the sugar dissolves completely. Remove from heat and stir in soaked gelatin until melted and smooth. Cool until slightly thickened but still pourable, testing it on the back of a spoon to check the consistency.
- Glaze and finish:
- Unmold the frozen cakes and place them on a wire rack over a baking sheet to catch drips. Pour the raspberry glaze over each cake in one smooth motion, allowing excess to drip off. Transfer to the refrigerator and allow to thaw for 2 hours before serving. Garnish with chopped pistachios and fresh raspberries right before serving.
 Save to Pinterest
 These tiny cakes have become my go-to for bringing something special to gatherings without spending the entire day in the kitchen. Last Valentine's Day, I made them for my husband, who admitted he had never cared for pistachio anything until that exact moment. Sometimes the most elegant desserts create the most unexpected converts.
Making Ahead
You can prepare the sponge layers up to two days in advance and store them wrapped tightly at room temperature. The assembled mousses can be frozen for up to one week before glazing, making them perfect for advance party prep. Just be sure to glaze them the day you plan to serve for that professional shine.
Troubleshooting
If your sponge comes out dense, next time whip the eggs and sugar longer until they are truly pale and tripled in volume. For mousses that do not set properly, ensure your gelatin was properly bloomed and fully dissolved. A glaze that looks dull probably needs to be strained through a fine mesh sieve to remove any raspberry solids.
Serving Suggestions
These cakes shine brightest when served slightly chilled but not icy cold, about 15-20 minutes after removing from the refrigerator. Pair with a glass of sparkling wine or a cup of delicate green tea. The individual portions make them perfect for dessert buffets or plated dinner party finales.
- Use a warm knife to cut clean slices if you want to reveal the beautiful layers
- Leftovers keep beautifully in the refrigerator for up to three days
- The glaze will remain glossy as long as the cakes stay chilled
 Save to Pinterest
 There is something deeply satisfying about cutting into these tiny cakes and seeing those perfect layers revealed. The first time someone asks how you made them, you will understand exactly why the effort was worth every single minute.
Your Recipe Questions
- → How long do these need to chill before serving?
-
Assembly requires approximately 3 hours of freezing time to set the mousse layers properly, followed by 2 hours of refrigeration after glazing to allow the desserts to thaw completely before serving.
- → Can I make these ahead of time?
-
These freeze exceptionally well for up to 2 weeks. Complete assembly and freezing, then add the glaze on the day of serving. The glazed portions should be consumed within 2-3 days for optimal texture and appearance.
- → What size molds work best for this dessert?
-
Ring molds or silicone dome molds measuring 6 cm (2.5 inches) in diameter produce ideal individual portions. The smaller size ensures proper setting of each layer and creates elegant presentation suitable for special occasions.
- → Can I use frozen raspberries instead of fresh?
-
Frozen raspberries work perfectly for both the mousse and glaze. Thaw them before blending, and strain thoroughly to remove seeds. The flavor remains consistent, though fresh raspberries make the best garnish for presentation.
- → What's the best way to achieve a smooth glaze finish?
-
Cool the glaze until slightly thickened but still pourable—around 30-35°C (85-95°F). Place frozen cakes on a wire rack over a sheet pan to catch drips, then pour the glaze in one steady motion starting from the center.
